How to create Salesforce custom address fields

As a Salesforce user, you understand the platform’s flexibility. To fully utilize this capability, it’s essential to learn how to create Salesforce custom address fields. These custom fields help capture crucial information and enhance data management, allowing the platform to better adapt to your unique business needs.
In this article, we’ve taken a user-centric approach, providing step-by-step instructions and best practices for creating custom address fields in Salesforce, tailored to your needs as a Salesforce user.
Whether you’re an admin, developer, or end user, enhancing address fields can tailor Salesforce to your needs, boosting productivity and accuracy in managing customer data.
Benefits of using custom address fields
Customizing address fields in Salesforce offers numerous benefits. Creating custom fields allows you to capture detailed information tailored to your business needs, leading to better customer experiences, decision-making, and operations.
Custom address fields allow you to include unique address components relevant to your industry or region, such as “province” or “county.” This ensures your CRM data accurately reflects the information crucial to your organization.
Additionally, custom address fields enhance data quality and consistency across Salesforce. Standardized field names and formats reduce duplicate records and entry errors, providing reliable insights for informed decision-making.
Understanding the different types of custom address fields
Salesforce offers a variety of options when it comes to creating custom address fields. Understanding the different types of custom address fields and their use cases can help you decide which fields to implement in your organization.
The most common types of custom address fields include:
- Address Line 1, Address Line 2, and Address Line 3: These fields allow you to capture the specific components of a physical address, such as the street number, street name, and any additional address details.
- City, State/Province, and Zip/Postal Code: These fields enable you to record the city, state or province, and zip or postal code associated with a physical address.
- Country: This field allows you to specify the country for a given address.
- Latitude and Longitude: These fields can store the geographic coordinates of a physical location, which can be useful for mapping and geospatial analysis.
- Custom Address Fields: Salesforce also allows you to create custom address fields to capture unique address components that are specific to your business, such as a ‘Shipping Address’, ‘Warehouse address’, ‘Conference event address’, or even ‘Customer’s Home Address ‘.
When deciding which custom address fields to create, consider the type of address information you need to collect.
Creating custom address fields in Salesforce
Creating custom address fields in Salesforce is a straightforward process that can be accomplished through the Salesforce setup menu. Here’s a step-by-step guide to help you get started:
- Navigate to the Setup menu: Log in to your Salesforce org and go to the Setup menu, typically located in the top right corner of the screen.
- Locate the Object Manager: In the Setup menu, find and click on the “Object Manager” option.
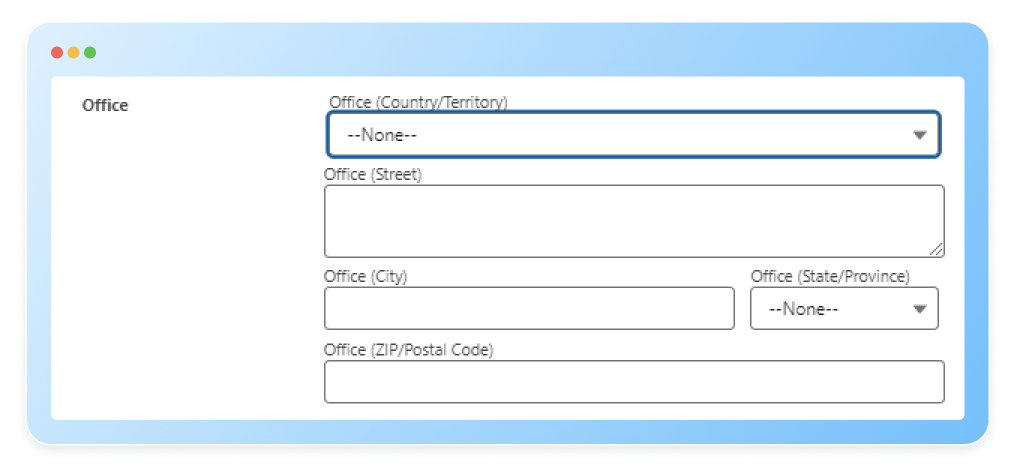
- Select the object: Choose the object (e.g., Account, Contact, or Lead) where you want to add the custom address fields. In our case, we chose the Account object and added Office as a new address field.

4. Create new fields: Click on the “Fields & Relationships” section and then select “New” to create a new field.
5. Choose the field type: For custom address fields, select the “Address” field type from the list of available options.

6. Configure the field settings: Provide a descriptive name for the field, choose the field-level security settings, and configure any other relevant settings based on your requirements.
This is the label field when creating or modifying a field in Object Manager:


This is the field on the Account object:
7. Save the field: Once you’ve completed the field configuration, click “Save” to create the custom address field.
Repeat these steps for each custom address field you want to add to the selected object. Remember to consider the different types of custom address fields and their use cases to ensure that you create the most relevant and useful fields for your organization.
As you create custom address fields, it is important to review and update any related page layouts, reports, and other Salesforce components to ensure that the new fields are properly displayed and integrated into your CRM system.
Best practices for naming and organizing custom address fields
Proper naming and organization of custom address fields are crucial for maintaining a well-structured and user-friendly Salesforce environment. By following best practices, you can ensure that your custom address fields are intuitive, easy to navigate, and aligned with your organization’s data management standards.
- Use clear and descriptive names: When naming your custom address fields, choose self-explanatory names that clearly indicate the information being captured. Avoid abbreviations or acronyms that may not be immediately understood by all users.
- Maintain consistency: Ensure that the naming conventions for your custom address fields are consistent across all objects and records within your Salesforce org. This consistency helps to maintain data integrity and makes it easier for users to understand and work with the address data.
- Group related fields: Organize your custom address fields into logical groupings or sections on the page layout. This can be done using field sets or custom address components, which improve the user experience and make it easier for users to find and interact with the address information.
- Leverage field-level help text: Provide clear and concise help text for each custom address field, explaining its purpose and expected format. This can help reduce data entry errors and improve user adoption.
- Consider field-level validation rules: Implement field-level validation rules to enforce data quality and consistency. For example, you can create rules to ensure that zip/postal codes are in the correct format or that specific fields are required based on the address type.
- Utilize custom labels and picklists: When appropriate, use custom labels and picklists to provide users with a pre-defined set of options for custom address fields. This can help to standardize the data and reduce the risk of inconsistencies or errors.
- Regularly review and maintain: Periodically review your custom address fields to ensure they continue to meet your organization’s evolving needs.
By following these best practices, you can create a well-organized and user-friendly custom address field structure that enhances the overall data management and user experience within your Salesforce environment.
Configuring and customizing address layouts
Once you have created your custom address fields, the next step is to configure and customize the address layouts in Salesforce. This process involves arranging the address fields on the page layout to ensure an intuitive and efficient user experience.
- Assess the existing layout: Review the default address layout for the object you’re working with (e.g., Account, Contact, or Lead). Identify any areas for improvement or customization that would better support your project’s goals.
- Organize the fields: Group related address fields together, such as grouping the address lines, city, state/province, and zip/postal code fields. This layout organization can be achieved using field sets or custom address components.
- Prioritize the most important fields: Determine which address fields are the most critical for your users and ensure that they are prominently displayed on the page layout. This may involve rearranging the field order or adjusting the field sizes to make the most important information easily accessible.
- Leverage section headings: Use section headings to provide clear visual cues and organization for the address fields. This can help users quickly identify and locate the address information they need.
- Test and gather feedback: Once you’ve made the necessary customizations, test the address layout thoroughly and gather feedback from end-users. Incorporate their input to refine and optimize the layout for maximum efficiency and usability.
By carefully configuring and customizing the address layouts in Salesforce, you can create a seamless and user-friendly experience for your team, ultimately improving data quality, productivity, and decision-making.
How 123FormBuilder Enhances Address Management
123FormBuilder streamlines managing custom address fields in Salesforce by offering an intuitive form creation and customization platform. You can easily design detailed address forms tailored to your business needs, without requiring advanced technical skills.
One key advantage is its seamless integration with Salesforce, which facilitates smooth data transfer and minimizes manual entry errors. This integration ensures that your address data remains consistent and accurate across systems. 123FormBuilder’s mapping capabilities also align form fields with Salesforce’s custom address fields, enhancing data synchronization and improving CRM efficiency.
Final thoughts
Customizing address fields in Salesforce significantly enhances your CRM’s capability to capture and manage detailed address information tailored to your business needs.
Moreover, integrating tools like 123FormBuilder can improve this process even further. Its user-friendly platform simplifies form creation and customization while ensuring seamless integration with Salesforce.
Load more...