How to add an upload button in Google Forms
Google Forms proves invaluable for gathering essential data to support your business operations. Whether you’re managing job applications, client registrations, or approval processes, Google Forms offers customizable solutions tailored to your needs. By incorporating an upload button, Google Forms streamlines workflows, mitigating the risks of errors associated with manual data entry and processing.
An important feature when gathering information is the ability to upload documents along with your form submission, which Google Forms offers in the form of a file upload button.
In many different cases, respondents might need to upload a file through the form.
- Your company needs to fill in a job position. Along with their information, applicants also need to attach their resumes.
- You are hiring models and need them to submit their portfolio.
- If you work as a tutor and have classes online, you need your students to submits their assignments.
- You need your clients to submit signed documents or contracts.
- You make custom gifts and need clients to submit their photo references.
Providing respondents the ability to upload files helps keep the documents together with the rest of the user’s submission. Because it’s an automated process, it also helps you to be organized and keep your inbox clean. You will no longer need to send them emails directly from your inbox and wait to receive the needed documents, which can be a hassle.
You start by signing in to your Google Forms account and opening a new form. You can create one from blank or use one of the available form templates.
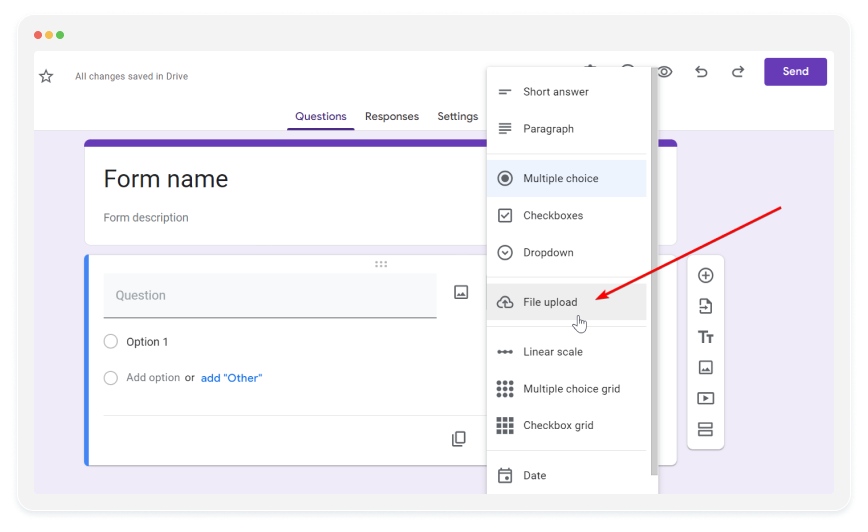
- Click on the Add question button:

2. And select File Upload:
Keep in mind that Google Forms mandates respondents to sign in to their Google accounts when file upload questions are included, potentially limiting accessibility for certain users. It’s worth exploring alternative tools that offer file upload functionality without the requirement of a Google sign-in.

3. Click on Continue and you can set up the specifications and restrictions of the field:

You can set what file types are allowed, the maximum number of files and the file size. And you’re done!
How to use 123FormBuilder for file uploads
While Google Forms excels in file collection, it’s essential to consider the additional features available in comprehensive form-building platforms like 123FormBuilder.
123FormBuilder offers over 100 file upload form templates which you can easily customize to fit your needs. Or you can create one from scratch.
Users can upload their documents with the 123FormBuilder form through the File Upload field. They can upload files, images, videos. You can place restrictions on the File Upload field, while also allowing certain file types. You can also allow folder upload or multiple files. The files can only be sent to Dropbox or Google Drive through their native form integrations.
Each plan package comes with its own available storage space. However, you can manage the files in your 123FormBuilder account and empty it from the Uploads Manager section.
123FormBuilder is taking all the active measures needed, so that the collected data either from submission or uploaded file is absolutely secured.
In conclusion, incorporating a file upload button into your Google Forms enhances the data collection process, catering to various needs such as job applications, client registrations, and document submissions. However, while Google Forms provides this feature, it’s essential to explore alternative form-building tools like 123FormBuilder, which offer a wider range of features and customization options.
123FormBuilder prioritizes data security, implementing robust measures to safeguard all collected data and uploaded files. Whether you’re using Google Forms or exploring other options, prioritizing the security and efficiency of your data collection process is paramount.
