How to create Salesforce Attachment objects
In Salesforce, you can perform various actions such as uploading, hosting, searching, accessing, downloading, and deleting files using the Notes and Attachments object. This functionality is accessible through the Notes and Attachments object itself.
The Notes and Attachments feature links files to a parent object record by using the parent ID on the uploaded file. This allows for centralized document storage while connecting them to specific records, which helps with archiving and managing records. Files can be conveniently tracked from the parent object record.
How to access Notes and Attachments
Standard objects, such as Account and Contact, already have the Notes and Attachments related list set up and accessible from the Related tab, which is where files can be found. Unlike the Files object, Notes and attachments can only be accessible from the parent record object.

Under the related list, click on Upload Files to begin the process of uploading one, or multiple files.

Each file will have its own details you can then view and manage while it is hosted.
How to set up and access Notes and Attachments on custom objects
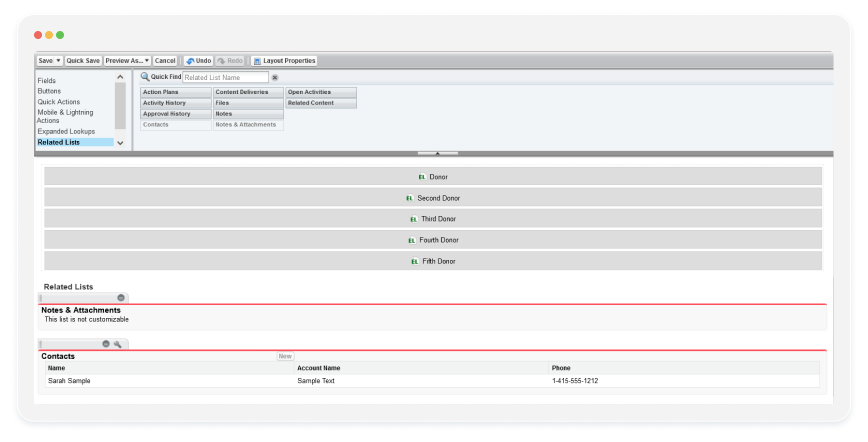
To see the related list for custom objects, you have to enable the related list on the object page layout. This is done from the Page Layouts section -> Related Lists.

Drag and drop the Notes and Attachments related list in the page layout. Once it’s added, the option from the tray will be greyed out. Then save the layout change. After a refresh of the session, the list will be available in the layout of the custom object.

Once a file is uploaded, you can then access it from the record. There are a few actions you can then act on to manage the file. From the list you can:
- Access to view and download the file.
- Share the file internally with other users in the org.
- Generate a public link for the file, with options such as adding a timer on how long it is available for public access, or adding a password to the file access.
- View, and edit the file details of Title and Description.
- Upload a newer version of the file on top.
- Delete the file, or remove it from the record.

From the record related list you can Upload additional files, which will appear in said list for further access.
How to restrict an manage access to Notes and Attachments for Users
When restricting internal access to Notes and Attachments is required, you can do so via profile setup.
- You can either set up a restriction to the parent object for the user’s profile, e.g.: only allow viewing, but not editing of the parent object record, and its related Notes and Attachments records.
- Or, you can set up a dedicated page layout for the profile, where you can omit the related list for Notes and Attachments entirely.
Either option will allow you to minimize access to uploaded files, to meet your minimum necessary policy.
The upload process requires a Salesforce user to login to manually upload a file, or you can integrate with an external source that will send the file to Notes and Attachments.
123FormBuilder falls in the latter category, as through our integration you can send files to the Notes and Attachments object automatically once the form is submitted by the external user. That could be a Lead, or Contact, for example providing additional documents when creating the parent lead as well, or adding additional documents to an existing record, all happening in the backend. Without the added step of a Salesforce user acting as the intermediary between the form front end user and the org in the backend, your org users can thus focus on the record processing alone, streamlining their workload.

Mastering Salesforce Attachment objects is crucial for efficient file management. Whether uploading, accessing, or restricting access, understanding these processes is key. Integration with tools like 123FormBuilder further simplifies data collection and processing, optimizing productivity.
Load more...