123FormBuilder – ADA Compliant Forms
The interest in Americans with Disabilities Act (ADA) Standards for Accessible Design increased in the last few years. More and more companies are looking to have accessible websites for individuals with various disabilities or impairments.
123FormBuilder accommodates those who have hearing impairments or learning, cognitive, and other disabilities. Therefore, we developed accessible forms that are easy to use and navigate.
How to enable accessibility features on your form?
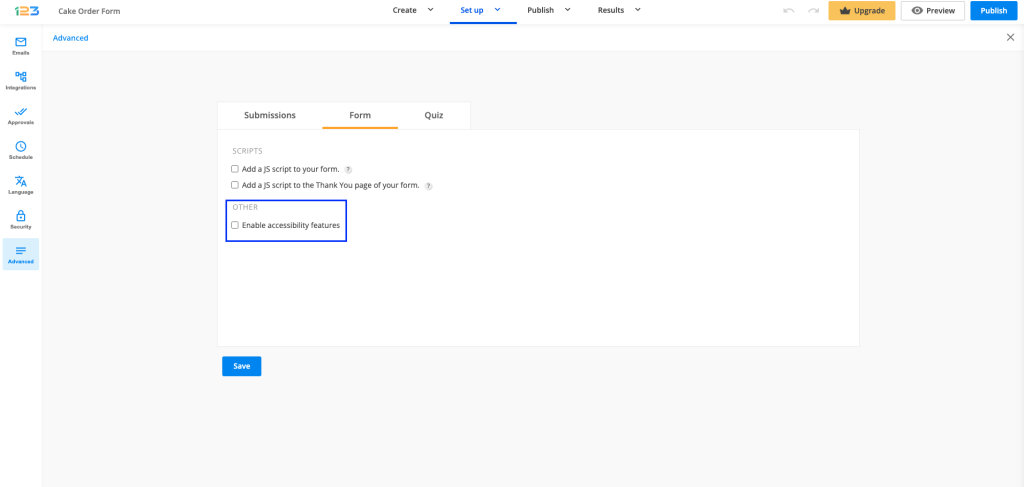
Open your web form, go to Set up -> Advanced, and switch to the Form tab.

In the Other subsection, you will find the option to Enable accessibility features.
It is important to mention that the Autofocus option from the forms Publish -> Embed form section conflicts with the accessibility feature. The first one highlights the first input field. If your form has text above the first field, people with visual impairments will not be able to read it.
How users interact with the form
Users need the NVDA tool installed on their devices. Our forms are ADA compliant only with Mozilla Firefox. By pressing Tab on their keyboard they will navigate through each form element.
Here are some suggestions to make your forms more accessible:
- Keep the form organized.
- Avoid multi-page forms.
- Add alt text to your images.
- Avoid placing the label inside the field. It’s not recommended to use our Name and Address fields. Add Short text fields or Long text fields instead. Long text fields can assist users with limited dexterity.
- Embed videos should have captions.
- Choose the best contrast colors.
- Adopt a simple design.
- Improve readability and comprehension by using white space and heading fields.
- Screen readers will check the headings in the order of their size, not in the order they have been placed on the form. Therefore, make sure to use the appropriate headings in the appropriate order.
Error prevention (for legal and financial forms)
On forms used for legal commitments or financial transactions, for the forms to be ADA compliant, you must ensure that the user can review and reverse their submissions.
Here are a few ways that can help you do so:
1. Allow respondents to edit delivered submissions at a later time. You can enable this feature from the forms Set up -> Advanced -> Submissions tab.
With this feature enabled, users will receive a link via email which they can use to make changes to the data they have submitted.
2. Allow respondents to preview the submission summary before sending the form. This feature can be found in the same section mentioned above.
3. Add a checkbox before the Submit button. Users will need to select the checkbox to confirm that they have reviewed their input and agree to the legal commitment or transaction that is about to take place.
You can use the Terms of Service field with an agreement text such as “I confirm that the input is correct and I am ready to submit”.
Similar Articles
Frequently Asked Questions
Here is a list of the most frequently asked questions. For more FAQs, please browse through the FAQs page.