Braintree payment gateway information
You can easily integrate Braintree with your form. This means you can trust our form builder services when receiving money in your Braintree account from your clients through form submissions.
Setting up your Braintree integration.
1. Click New Form from your account dashboard and start creating your payment form.
You can use choice fields (single/multiple choice and dropdown lists) to display the products on sale or, even better, Product field.
2. In your Form Editor, in the left side panel, you will notice the Payments section. By using the search bar, you can quickly find Braintree.
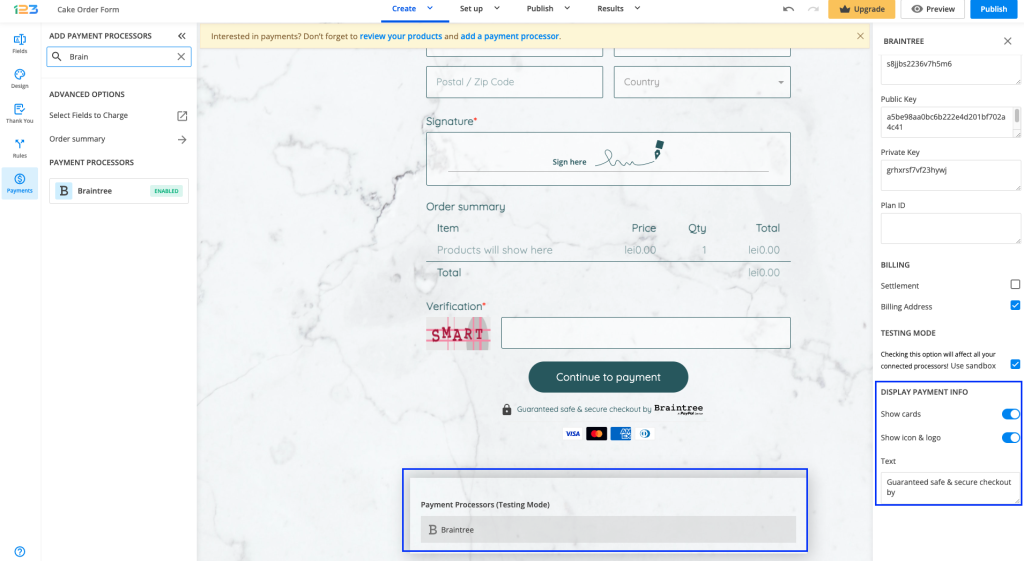
3. After adding Braintree on your form, you will notice a couple of changes: the Braintree payment processor has a tag near its name & the settings panel opens up to the right side of the page.
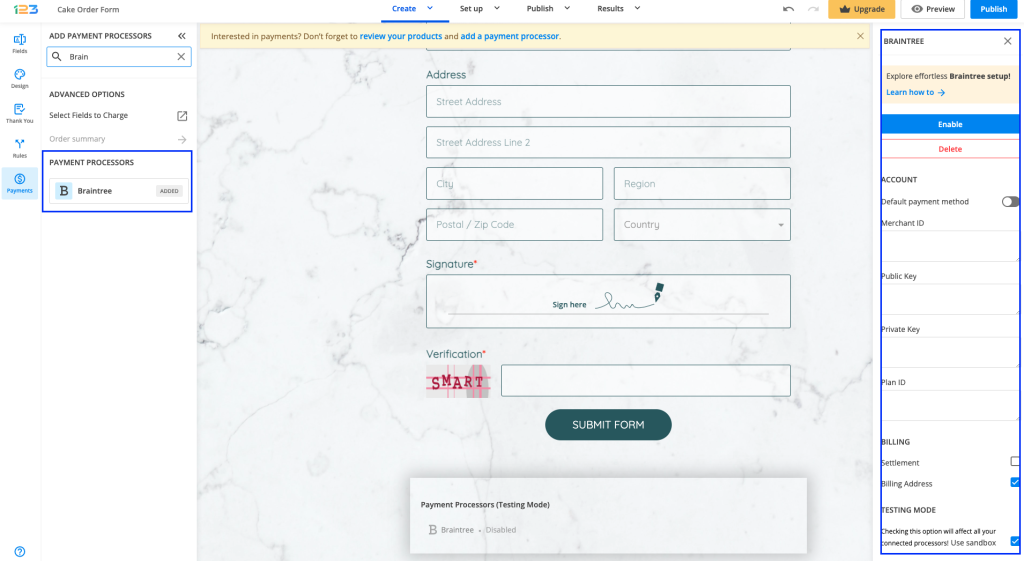
4. In order to enable Braintree, you need to provide the Merchant ID, the Publich Key, Private Key and Plan ID.
5. Enable the payment integration by clicking on Enable button. By enabling Braintree, you will notice a couple of changes on your form.
The Braintree payment processor on the left side panel has an Enabled tag on it so you could easily scan which payment processor is enabled.
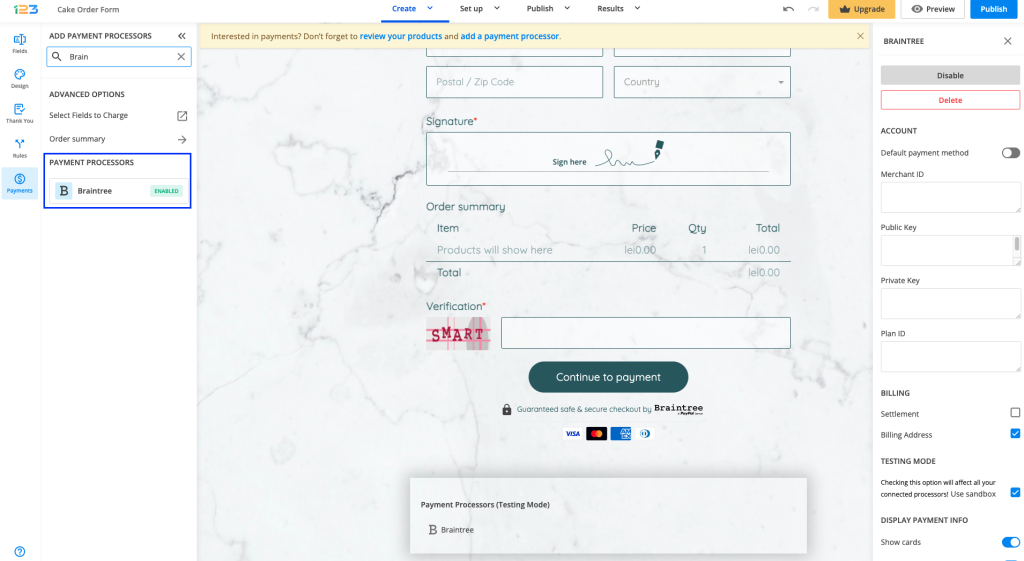
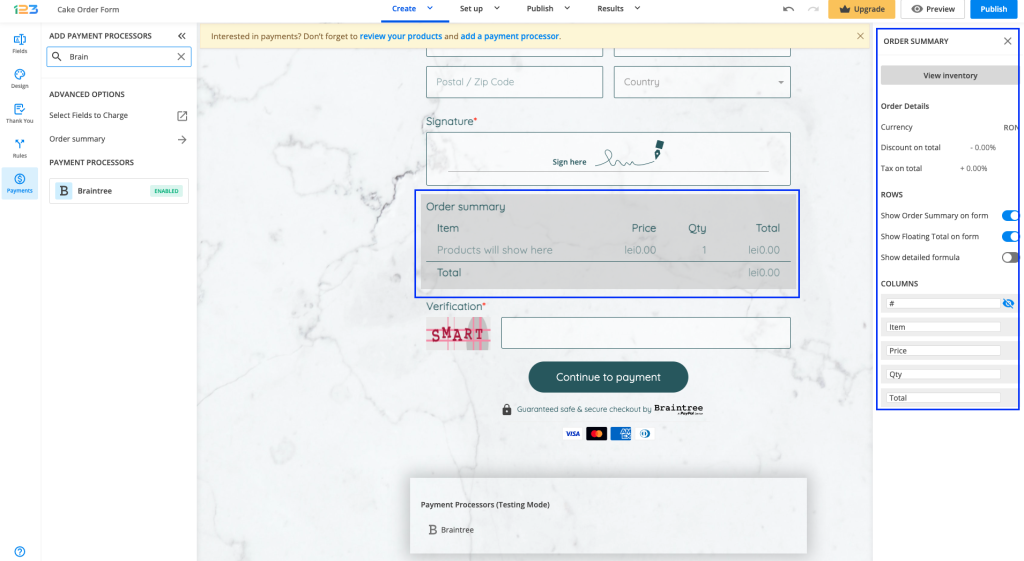
Another change is that on your form it will be displayed an Order summary. Here will appear all the products your respondents select on the form, together with the price per option, quantity and the total price. If you want to customize the order summary, all you have to do is click on it and the available settings appear on the right side panel.
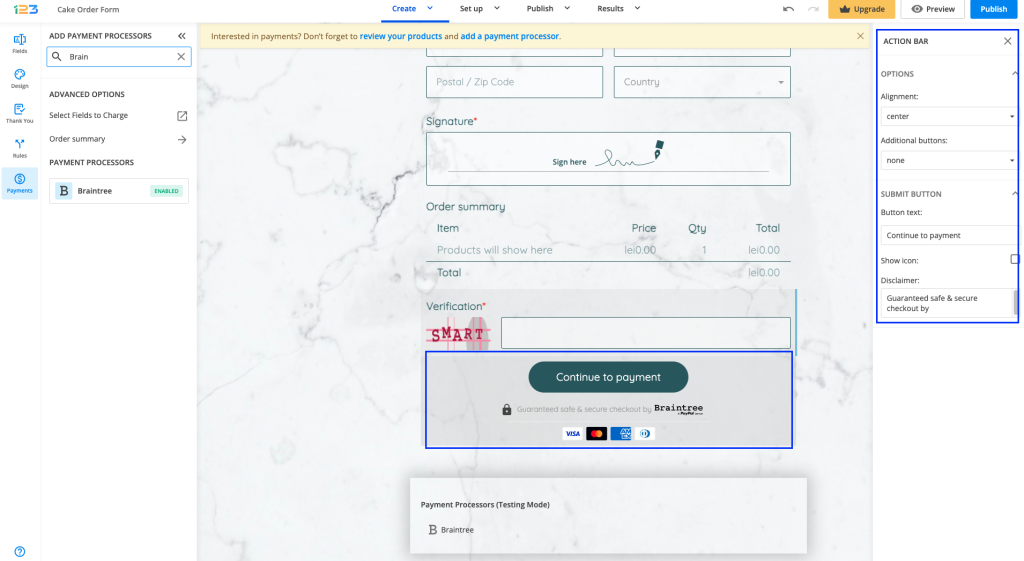
Another change is related to the Submit button. Once your payment integration is enabled, the Submit button is changed to Continue to payment. Below it, we are displaying a disclaimer together with the Braintree logo so that respondents are aware they are proceeding to a payment.
Also, the accepted cards by the Braintree integration are visually displayed so that respondents know from the start what is the accepted payment method.
You can customize the action bar (everything that is related to the submit button, additional buttons, disclaimer, etc) by simply clicking on this area.
By clicking on the Payment processor below the form, the settings for the payment processor are opened to the right side panel. Another thing that you can customize is whether you want to show the accepted cards & the icon and logo on the form. By default, they are on.
Braintree is an easy solution for merchants, who seek the ideal payment gateway for their online businesses. Its services are available in Europe, the United States, Canada, Australia, Singapore, Hong Kong SAR China, Malaysia, and New Zealand. Payments can be made in over 130 currencies, shown in the table below.
Here is what you can benefit from by using Braintree:
1. Processing payments through your website or by mobile phone.
2. Use recurring billing, which must be set in your Braintree account and not in the Payments section of your 123FormBuilder account.
3. Customized pricing offers if you’re running a company that processes thousands of transactions per month.
For more information follow Braintree’s frequently asked questions section.
Start your online business and make money by integrating Braintree into your 123FormBuilder forms.
Braintree – Available currencies
| United Arab Emirates dirham | Armenian dram | CFA franc | Argentine peso | Australian dollars |
| Zambian kwacha | Azerbaijani manat | Bosnia and Herzevina Convertible Marks | Barbados dollar | Bangladeshi taka |
| Bulgaria lev | Zimbabwean dollar | Bahraini dinar | Bermudian dollar | Brunei dollar |
| Bolivian boliviano | Brazilian real | Bahamian dollar | Botswana pula | Belarussian ruble |
| Belizean dollar | Canadian dollars | Swiss franc | Chilean peso | Chinese Yuan renminbi |
| Colombian peso | Costa Rican colon | Serbian dinar | Cape Verde escudo | Cyprus pound |
| Czech Republic koruna | Djiboutian franc | Danish krone | Dominican peso | Algerian dinar |
| Estonian kroon | Egyptian pound | Ethiopian birr | Euro | Fiji dollar |
| Falkland Islands pound | British Pound Sterling | Georgian lari | Ghanan cedi | Gibraltar pound |
| Gambian dalasi | Guinea franc | Guatemala quetzal | Guinea-Bissau peso | Guyanese dollar |
| Hong Kong dollar | Honduras lempira | Croatia kuna | Haitian gourde | Hungarian forint |
| Indonesian rupiah | Israeli shekel | Indian rupee | Iceland krona | Jamaican dollar |
| Jordanian dinar | Japanese yen | Kenyan shilling | Kyrgyzstan som | Cambodian riel |
| Laos kip | Comoroan franc | South Korean won | Kuwaiti dinar | Cayman Islands dollar |
| Kazakhstan tenge | Lebanese pound | Sri Lanka rupee | Lithuania litas | Latvia lat |
| Libyan dinar | Moroccan dirham | Moldova leu | Mongolia tugrik | Macanese pataca |
| Mauritanian ouguiya | Maltese lira | Mauritius rupee | Maldiveres rufiyaa | Malawi kwacha |
| Mexican peso | Uzbekistan som | Malaysia ringgit | Nigeria naira | Nicaraguan cordoba |
| Norwegian krone | Nepalese rupee | New Zealand dollar | Omani rial | Panamian balboa |
| Peru Nuevo sol | New Guinea kina | Philippine peso | Pakistan rupee | Poland zloty |
| Paraguayan guarani | Qatari rial | Romanian lei | Tanzanian shilling | Russian ruble |
| Rwanda franc | Saudi Arabian riyal | Solomon Islands dollar | Seychelles rupee | Swedish krona |
| Singapore dollar | St. Helena pound | Slovenian tolar | South African Rand | Sierra Leonean leone |
| Somalia shilling | Sao Tome & Principe dobra | Swaziland lilangeni | Thailand baht | |
| Tonga pa’anga | New Turkish lira | Trinidad and Tobago dollar | New Taiwan dollar | |
| Vanuatu vatu | Uganda shilling | US dollar | Uruguayo peso | |
| Venezuelan bolívar | Vietnam dong | Yemeni rial | Ukraine hryvnia | |
| East Caribbean dollar | CFP Franc | Samoan tala | Tunisian dinar |
Similar Articles
Frequently Asked Questions
Here is a list of the most frequently asked questions. For more FAQs, please browse through the FAQs page.
