How to setup multiple email notifications in 123FormBuilder

Setting up multiple email notifications in 123FormBuilder allows you to simplify communication and ensure that the right people are notified based on specific form responses. Here’s a step-by-step guide to configuring multiple email notifications for your forms.
In this video tutorial, we’ve built a form titled “Automotive Parts for Sale,” which includes a product field. We’ve tailored various types of email notifications based on the delivery location provided by respondents.
Initially, we established an email notification to the respondent containing an order summary and the delivery location. Subsequently, we’ve crafted another email notification to notify the service provider of the new order. In our example, we’ve duplicated these emails for each delivery location and configured appropriate rules.
Furthermore, we’ve integrated Stripe payment processing into the form to manage transactions seamlessly. In the video, you’ll also learn how to customize the email template to better suit your needs. These adjustments ensure that your form is user-friendly and that your emails effectively communicate with your customers.
Step-by-Step Guide to Setting Up Email Notifications in 123FormBuilder
123FormBuilder is a versatile tool that allows users to create forms for any purpose, including registrations, surveys, and orders. Correctly setting up email notifications ensures you don’t miss any data collected through these forms. Here’s how to do it:
- Sign In and Choose Your Form: First, sign into your 123FormBuilder account. Then, select a form template to edit from your dashboard or create from scratch.
- Access Set up: Go to the ‘Emails‘ tab. This section allows you to oversee all aspects of your email notifications.
- Create a New Email: Click on ‘New Email‘ tab. Here, you can start configuring a new notification from the ground up or use predefined templates that you can adjust to your needs.
- Configure the Notification type and when it should be triggered:
- Send to – Recipient Details: Enter the email addresses of the recipients. You can add multiple emails separated by commas.
- Custom Subject Line and Message: Craft your subject line and message body. Use placeholders for dynamic content, such as form field values.
- Set Rules: Set conditions for sending the notification based on specific answers within the form.
As the form owner, you can also configure email alerts to receive notifications whenever a form is submitted or a payment is processed.

5. Test Your Notification: Before going live, send a test email to yourself to ensure that everything appears as expected.
Customizing Email Notifications for Different Recipients
Customizing email notifications involves tailoring the content and timing of the emails to meet the specific needs and preferences of different recipients. Here’s how to effectively customize these notifications in 123FormBuilder:
- Segment Your Audience: Identify different groups within your form respondents or user base. For example, you might separate them by roles, such as customers, form owners, staff, or management.
- Use Conditional Logic: 123FormBuilder allows conditional logic to send notifications based on specific responses or criteria. This ensures that recipients only receive relevant emails.
- Personalize the Content: Customize the email content to speak directly to the recipient’s interests and relationship with your organization. Personalization can significantly increase the open and engagement rates.
- Schedule Notifications Appropriately: Timing is crucial. Schedule notifications based on the optimal time for each recipient group. For instance, immediate notifications might be critical for your support team, while a weekly summary could suffice for management.
When used effectively, multiple email notifications make communication easier, increase user engagement, and improve efficiency. With tools like 123FormBuilder, businesses can customize and time these notifications, leading to better management and happier users.
Adding Conditional Logic to Email Notifications
Conditional logic in email notifications allows you to send messages based on specific conditions or responses within your forms. This targeted approach ensures that people receive the correct information at the right time without overwhelming them with irrelevant content.
How to Implement:
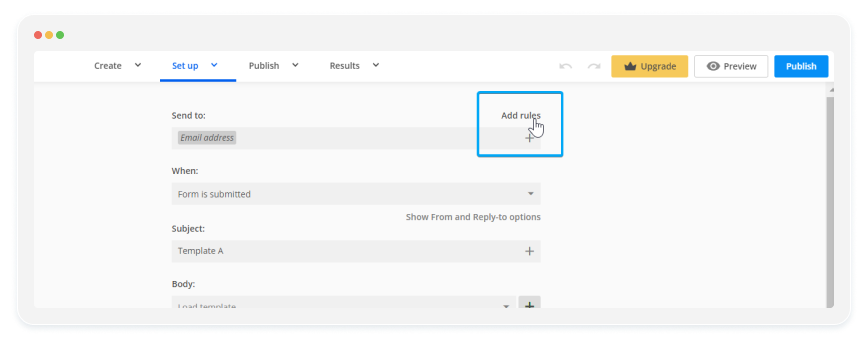
- Access the Emails Tab
- Choose the Add rules option to add conditions based on the answers provided in the form. For example, if a respondent selects a particular delivery location, the form can trigger an email notification to that effect.
Integrating Email Notifications with Other Tools and Platforms
Integrating forms with payment gateways such as Stripe further automates and refines the efficiency of transaction-related communications. When Stripe processes a payment, 123FormBuilder triggers specific email notifications based on the transaction status, such as payment confirmations, receipts, or alerts on failed transactions.
This integration makes managing financial transactions easier and improves the customer experience by providing instant, relevant transaction information.
Final thoughts
Mastering email notifications within 123FormBuilder involves understanding and implementing a mix of basic settings, advanced features, and strategic integrations. The journey from setting up simple alerts to creating a fully integrated communication ecosystem can significantly impact your operational success.
Load more...