123FormBuilder Knowledge Base
Search our documentation platform for answers, service specifications and 3rd-party integrations.
[AppExchange – 123FormBuilder] Prefill dropdown with picklist values
Let’s assume you want to bring all the available values from a specific Salesforce picklist, without manually adding those values in the 123FormBuilder field. The pre-selected value on the form must be the one selected in Salesforce on that specific record.
To walk you through the setup, let’s consider this scenario:
I want to prefill on the form the Lead Source dropdown, but also list all the other available choices from the Salesforce picklist, in case the person filling out the form needs to change the selected option.
- SF Object → Contact
- SF Picklist → Lead Source
Let’s get started. Follow this step by step guide:
Step 1. Import picklist values in the Form Editor
In the Form Editor section of the form builder, click on your choice field, and on the right-side panel click on Import From Salesforce.

Next, choose your Salesforce object and picklist field to retrieve their values:

Step 2. Create lookup to return from Salesforce the selected value for a specific record and prefill a text field
First, add a short answer field on the form. You can even set it to be hidden on the form, the prefill will work regardless of whether the field is displayed or not on the form.

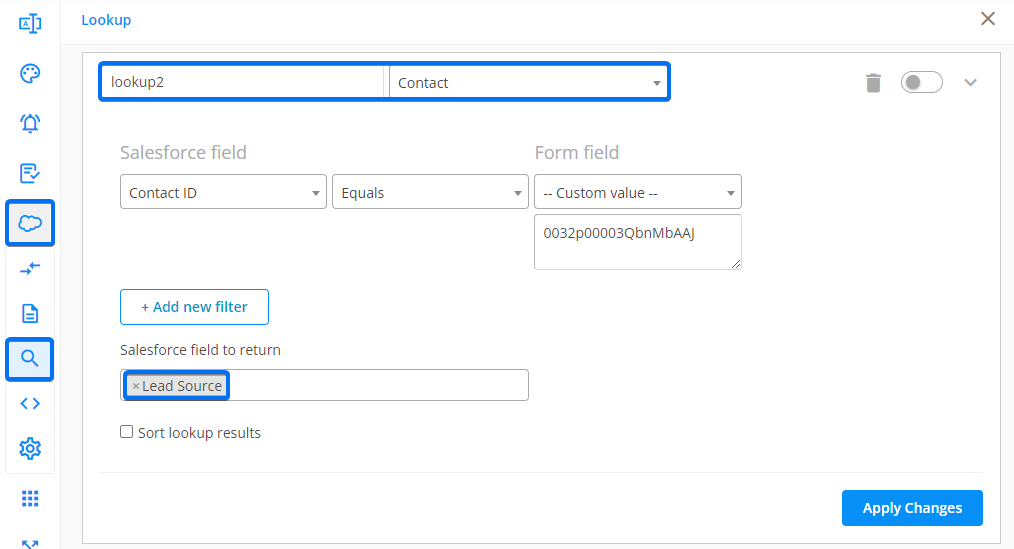
Create a new lookup and choose from which object you want the information to be prefilled.
Remember that in this scenario, I want to prefill Lead Source from Contact, so the new Lookup will be on the Contact object and I will return the Lead Source field from Salesforce:
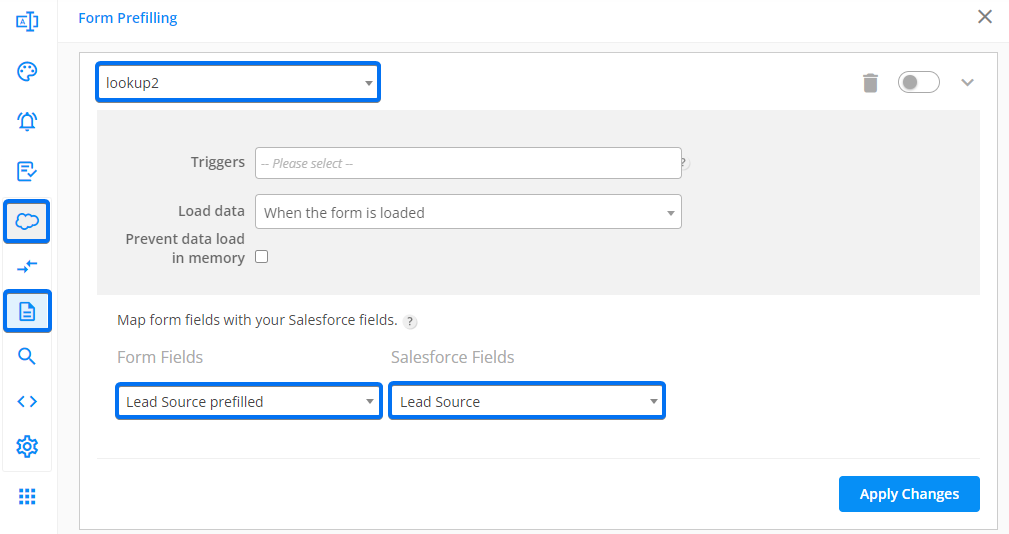
Now, let’s prefill the text field with that value.
Navigate to Form Prefilling, create a new prefill connector, and select the lookup created above. At Form Fields, choose your text field, and at Salesforce Fields choose the value returned from Salesforce.
Step 3. Create, upload, and add to the form this custom JS
This is the final step needed to return from Salesforce the selected value for a specific record and prefill a text field.
Copy the following script in a text editor:
(function()
{ window.addEventListener('load', function(){
loader.engine.on('compute-form-rules-done', function() {
var value = loader.getDOMAbstractionLayer().getControlValueById('34752448'); // '34752448' id of the control where the selected value is (the hidden input)
loader.getDOMAbstractionLayer().setControlValueById('34752445', value); //'34752445' id of the picklist values (the dropdown)
});
});
})();
Replace the field IDs that are bold in the script with your own field IDs.
To find your field IDs, right-click on the field, select Inspect Element, and hover the mouse cursor over your entire field. The ID will be listed after data-id. For more information check out this guide.
After you replace the field IDs, save the file with the .js extension and upload the JS script file on a secured hosting service.
Once you have the script URL, go to your form’s Advanced → Form tab section and paste the script under Add a JS script to your form.
If you use dynamic prefill, where the prefill is triggered by user input rather than on form load, then use the following script:
function theMainFunction(){ setTimeout(function() { var value1 = loader.getDOMAbstractionLayer().getControlValueById('2912856'); // '2912856' id of the control where the selected value is (the hidden input) loader.getDOMAbstractionLayer().setControlValueById('2900914', value1); //'2900914' id of the picklist values (the dropdown) var value2 = loader.getDOMAbstractionLayer().getControlValueById('2912858'); // '2912858' id of the control where the selected value is (the hidden input) loader.getDOMAbstractionLayer().setControlValueById('2900915', value2); //'2900915' id of the picklist values (the dropdown) }, 10000); //10000 = 10 seconds } window.onload = theMainFunction;Replace the field IDs that are bold in the script with your own field IDs.
In the script above, you can adjust the number of seconds for the script to load. For instance, 10,000 milliseconds equals 10 seconds. You can modify this based on the prefill loading time.
Related articles
Similar Articles
Frequently Asked Questions
Here is a list of the most frequently asked questions. For more FAQs, please browse through the FAQs page.